What Causes Wooden Brush Handles to Crack or Warp During Use?
Frustrated when your wooden brush handles crack, warp, or split after only a short time? This common problem ruins tools and suggests poor quality or improper care. Let's uncover the causes.
The main causes are fluctuations in moisture content (wood swelling/shrinking), improper initial drying by the manufacturer, exposure to excessive heat or harsh chemicals, and sometimes inherent defects in the wood itself.
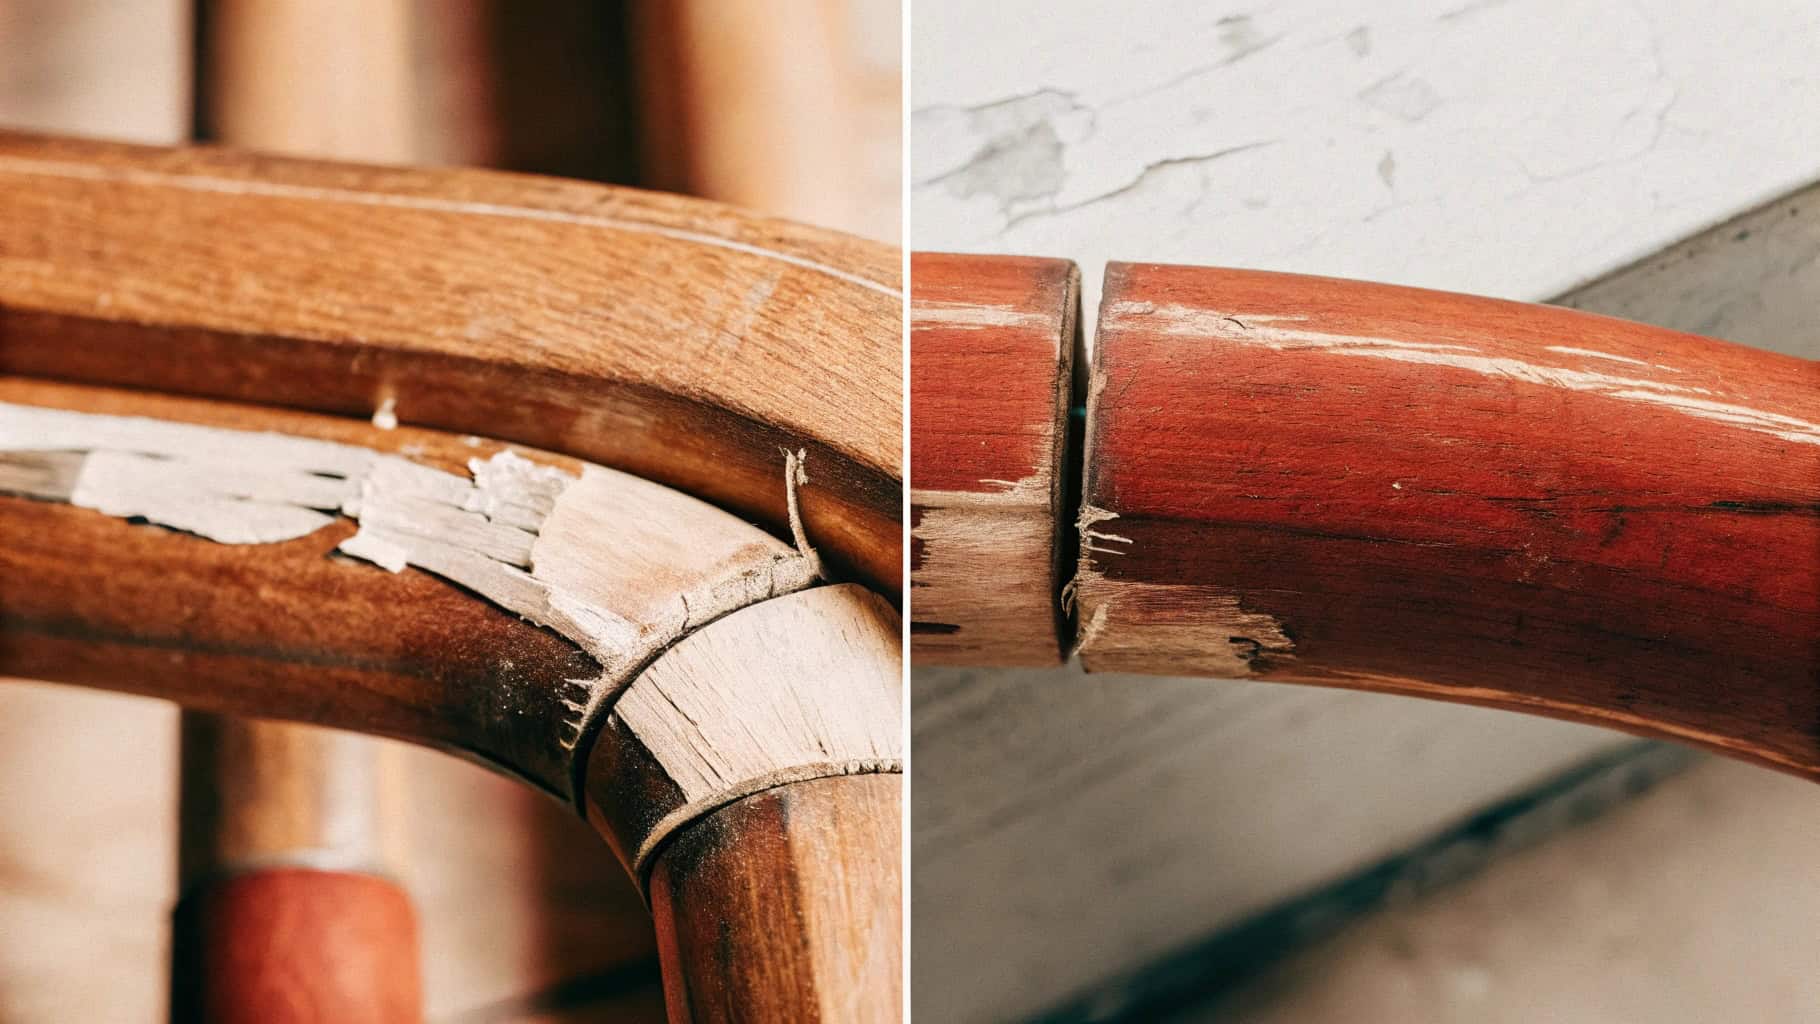
A wooden handle should provide years of comfortable service, but environmental factors and manufacturing quality play huge roles in its longevity. Understanding why wood moves, cracks, or warps helps you choose better handles and care for them properly. As a manufacturer of wooden handles at JDW, controlling these factors is a key part of our quality process. Let's explore the reasons behind these common failures.
Why Might a Wooden Paint Brush Handle Be Unfinished?
Notice some paintbrush handles lack the typical glossy finish? This isn't always a sign of low quality; sometimes it's intentional, though often it relates to cost.
Handles might be unfinished for cost savings on budget brushes, to allow the user to apply a custom finish (like oil for better grip), or for specific crafts where finish might interfere.
Diving Deeper into Unfinished Handles
Seeing a raw, unfinished wooden handle on a paintbrush can raise questions. Is it cheaper? Is there a benefit? The reasons can vary.
Cost Savings
- Manufacturing Step Skipped: Applying a finish (sanding sealer, lacquer, paint) involves multiple steps: application, drying/curing time, often sanding between coats, and quality control for the finish itself. Skipping these steps significantly reduces manufacturing time and cost.
- Budget Brushes: Consequently, unfinished handles are most commonly found on lower-priced, utility-grade, or disposable brushes where minimizing cost is the primary objective. The assumption is the user doesn't expect high refinement or longevity, or might even discard the brush after one use.
User Customization / Preference
- Applying Own Finish: Some users, particularly woodworkers or those sensitive to certain chemicals, prefer to apply their own specific finish. An unfinished handle provides a blank slate. Common choices include:
- Penetrating Oils (BLO, Tung Oil): Offer excellent grip and a natural feel, often preferred by those who dislike the slickness of lacquer. Easy to reapply.
- Wax Finishes: Provide a soft sheen and smooth feel.
- Custom Paints/Stains: To match other tools or for personalization.
- Enhanced Grip (Oil): An oil finish, unlike lacquer, maintains more of the wood's natural texture, which many find provides a better, less slippery grip, especially if hands get sweaty. Some users intentionally sand off factory lacquer and apply oil for this reason.
Specific Applications
- Crafts/Glue Brushes: For simple brushes intended for applying glue or other craft materials where the handle finish is irrelevant or might interfere with cleanup, manufacturers might leave them unfinished to save cost.
- Minimalist Aesthetic: Occasionally, an unfinished look might be a deliberate design choice for a rustic or minimalist aesthetic, though usually, even these would have a light protective oil or wax finish.
Downsides of Unfinished Handles
- Lack of Protection: The primary drawback. Unfinished wood readily absorbs moisture, oils from hands, paint, solvents, and dirt. This leads to staining, potential warping or cracking (due to moisture changes), and makes the handle harder to clean.
- Roughness/Splinters: Unless sanded exceptionally well, unfinished wood can feel rough or even develop splinters over time.
- Reduced Lifespan: Exposure to moisture and lack of protection generally shortens the handle's lifespan compared to a properly finished one.
Unfinished Handle Considerations
| Aspect | Implication of Being Unfinished | Potential User Action |
|---|---|---|
| Protection | None (Absorbs moisture/dirt) | Apply Oil/Wax/Lacquer |
| Feel/Comfort | Can be rough, potential splinters | Sand smooth, Apply finish |
| Grip | Maximum natural texture (can be good/bad) | Apply Oil for enhanced grip |
| Durability | Lower (prone to staining, cracking, warping) | Apply protective finish |
| Cost | Lower initial purchase price | Factor in cost/time of finishing |
| Customization | Easy to apply custom finish/paint/stain | User applies desired treatment |
So, while often a sign of a budget brush, an unfinished handle can sometimes be intentional, offering a blank canvas for user customization or a specific tactile preference, albeit at the cost of protection and longevity if left untreated.
How Do You Fix a Deformed Brush?
Is your brush's shape distorted, with bristles bent or splayed out? This deformation ruins painting precision and makes cleaning difficult, often caused by improper use or storage.
Fix deformed synthetic bristles by dipping them in hot (not boiling) water or steaming them, then reshaping gently and allowing them to dry completely. Natural bristles are harder to fix.
Diving Deeper into Reshaping Brush Bristles
Disclaimer: This section focuses on fixing the bristles of a brush, as that's the most common meaning of a "deformed brush." Handle deformation (warping/cracking) is generally irreversible damage caused by factors discussed elsewhere.
When paintbrush bristles lose their shape – becoming bent, splayed, or crooked – the brush loses its ability to create clean lines and apply paint evenly. This often happens due to:
- Leaving the brush resting on its bristles in water or solvent.
- Storing the brush improperly (crushed against other items).
- Using harsh solvents that damage the bristles.
- Allowing paint to dry hard within the bristles.
Fixing Synthetic Bristles (Nylon, Polyester)
Synthetic filaments have thermoplastic properties, meaning they soften slightly with heat, allowing them to be reshaped.
- Clean Thoroughly: First, ensure the brush is completely clean of any dried paint residue. Dried paint will prevent reshaping. Use the appropriate solvent (water for latex/acrylic, mineral spirits for oil) and a brush comb if necessary.
- Heat Treatment:
- Hot Water Method: Heat water until it's very hot but not boiling (boiling water might damage the ferrule glue or some plastics). Dip the deformed bristles into the hot water for 30-60 seconds. The heat should relax the bent filaments.
- Steam Method: Carefully hold the bristles over steam from a kettle (use tongs or gloves to avoid burns). The steam achieves the same relaxing effect.
- Reshape Gently: Remove the brush from the heat/steam. While the bristles are warm and pliable, gently reshape them back into their original form using your fingers. You can wrap them lightly with paper towel or string to help hold the shape as they cool.
- Dry Completely: Allow the brush to dry thoroughly, preferably hanging bristles-down or lying flat, before using it again. The bristles should retain the corrected shape once cool and dry.
- Note: This works best for moderate deformation. Severely kinked or melted bristles may not fully recover.
Fixing Natural Bristles (Hog, Sable, etc.)
Natural hair bristles are much harder, often impossible, to permanently reshape once badly deformed.
- Cleaning is Key: The best approach is meticulous cleaning immediately after use to prevent paint from drying and distorting the shape. Use appropriate cleaners and a brush comb.
- Reshaping While Wet: After cleaning, gently reshape the bristles with your fingers while wet.
- Proper Drying: Allow the brush to dry completely in the correct shape (hanging bristles-down or flat). Sometimes wrapping the bristles neatly can help during drying.
- Conditioners: Using brush soap or conditioner can help maintain the suppleness of natural bristles, making them less prone to becoming misshapen.
- Limited Recovery: Unlike synthetics, heat won't effectively reset the shape of natural hair. If severely splayed or bent from dried paint or improper storage, the brush may be permanently damaged.
Fixing Handle Issues (Briefly)
- Warped Handle: Generally cannot be fixed. Caused by moisture/drying issues. Prevention (proper finishing, avoiding soaking) is key.
- Cracked Handle: Minor cracks might be stabilized with CA glue (superglue) or epoxy, but strength is compromised. Replacement is usually best.
- Loose Handle: If the handle is loose in the ferrule, epoxy can sometimes be used to re-secure it, but it indicates a potential quality issue with the original crimp or glue joint.
Deformation Solutions Summary
| Issue | Material Affected | Solution(s) | Success Rate | Prevention |
|---|---|---|---|---|
| Bent/Splayed Bristles | Synthetic | Clean, Hot Water/Steam, Reshape, Dry | Good-Very Good | Clean promptly, Store properly |
| Bent/Splayed Bristles | Natural | Clean, Reshape Wet, Dry Carefully, Conditioner | Poor-Fair | Clean promptly, Store properly |
| Warped Handle | Wood | None (Irreversible) | N/A | Proper finish, Avoid soaking/dishwasher |
| Cracked Handle | Wood | Glue/Epoxy (minor cracks), Replacement (best) | Fair (minor) | Avoid dropping, Quality wood |
| Loose Handle | Wood/Ferrule Joint | Epoxy (potential fix), Replacement (indicates issue) | Fair | Quality brush construction |
Focusing on bristle care through proper cleaning and storage is the best way to prevent deformation in the first place.
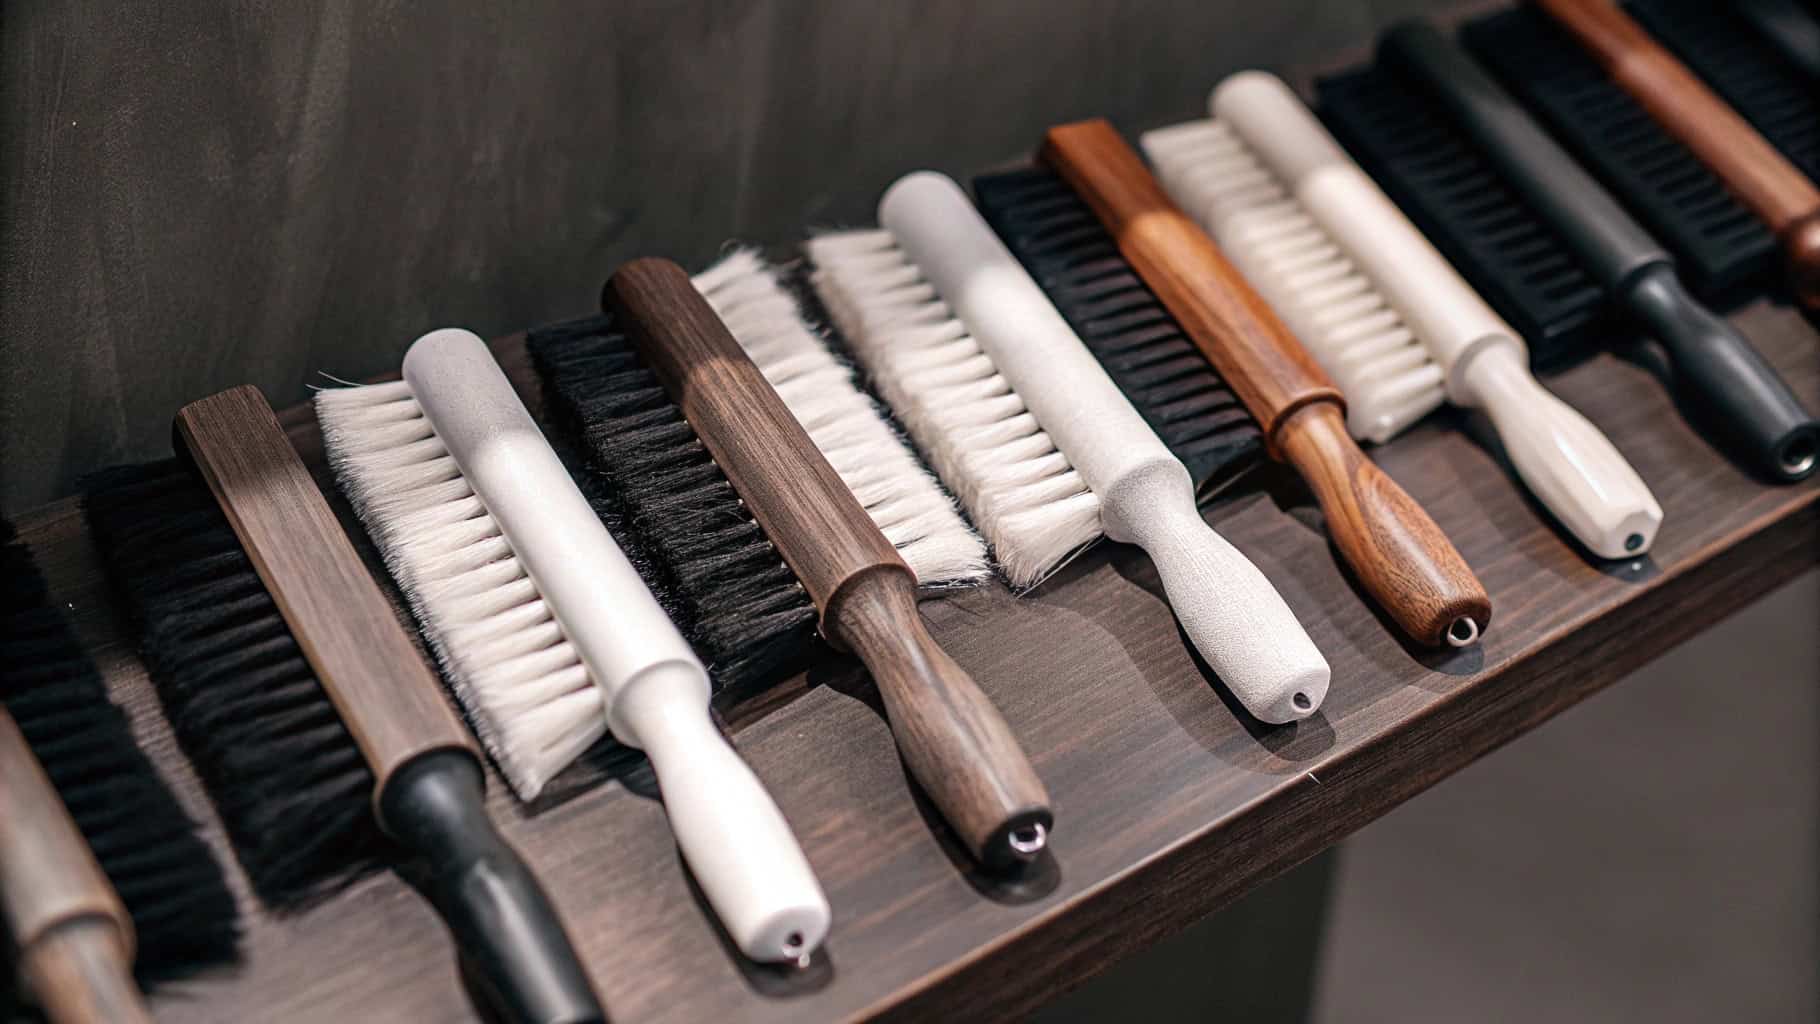
What are the Different Types of Brush Handles?
Thinking handles are just functional grips? Their design varies significantly in shape, length, material, and attachment, each tailored to specific brush types and user needs.
Handles differ by connection (threaded, tapered, fixed for different heads), length (short for control, long for reach), shape (round, oval, ergonomic for grip), and material (wood, plastic, metal for durability/feel).
Diving Deeper into Handle Diversity
The handle is a key ergonomic and functional component of any brush. Manufacturers like JDW produce handles in various configurations to meet the needs of different brush applications.
Connection Types (Attachment to Head)
- Threaded: Features a screw tip (metal/plastic). Screws into brush heads like brooms, mops, paint rollers. Allows easy swapping of heads. Requires matching thread size/type.
- Tapered: Smoothly tapered end fits into a matching socket via friction. Common for traditional brooms, push brooms, some garden tools. Simple, economical, needs precise fit.
- Fixed (Straight-Cut/Ferrule): Handle end is permanently fixed into a socket or metal ferrule using screws, rivets, or epoxy. Standard for paintbrushes, artist brushes, files, many scrub brushes. Not designed for easy replacement.
Length Variations
- Long Handles (e.g., 48"-60"): For tools used while standing (brooms, mops, floor scrubs, long-reach dusters). Provide reach, leverage, better posture.
- Short Handles (e.g., 6"-18"): For handheld tools requiring precision and control (artist brushes, detail paintbrushes, hand scrubs, dustpan brushes, file handles).
Shape Variations (Cross-Section & Profile)
- Round/Dowel: Simple, common, versatile grip (broom handles, artist brushes).
- Oval: Often preferred for tool handles (hammers, axes) to prevent twisting and improve grip orientation. Can also be used for comfort on other handles.
- Flat/Beavertail: Wider, flatter shape, often contoured. Common on wall paintbrushes for comfortable palm grip.
- Rattail/Sash: Round or oval, often tapering. Allows varied grips for control on trim/sash paintbrushes.
- Ergonomic: Custom-molded or shaped contours designed to fit the hand naturally, reducing fatigue. More common in plastic but achievable in wood with advanced manufacturing (like CNC used at JDW).
Material Variations
- Wood: Natural feel, comfortable, aesthetic, good balance. Requires finishing. Hardwoods (Beech, Birch, Maple) preferred for quality; Softwoods (Pine) for economy.
- Plastic: Lightweight, cheap, water/chemical resistant, easily molded. Can feel less premium, generates static. Types vary in durability (PP, ABS > PS).
- Metal: Durable, rigid. Mainly for extension poles or heavy industrial use. Heavy, conducts temperature.
- Bamboo: Sustainable, hard, lightweight, water-resistant. Natural aesthetic.
Handle Type Application Examples
| Brush Type | Typical Connection | Typical Length | Typical Shape(s) | Common Material(s) | Key Handle Requirement(s) |
|---|---|---|---|---|---|
| Broom/Mop | Threaded or Tapered | Long | Round | Wood (Pine/Hardwood), Metal | Strength, Length |
| Artist Brush | Fixed (Ferrule) | Short or Long | Round, Ergonomic | Wood (Beech/Birch) | Balance, Comfort, Smoothness |
| Paint Brush (Wall) | Fixed (Ferrule) | Short | Beavertail, Flat | Wood (Beech/Poplar), Plastic | Comfort, Grip |
| Paint Brush (Trim) | Fixed (Ferrule) | Short | Rattail, Pencil | Wood (Beech/Birch), Plastic | Control, Grip |
| Scrub Brush (Hand) | Fixed or Molded | Short | Blocky, Ergonomic | Wood (Beech/Ash), Plastic | Durability, Grip |
| Hair Brush | Fixed (Integrated) | Short | Ergonomic | Wood (Beech/Maple), Bamboo, Plastic | Smoothness, Comfort, Aesthetics |
Understanding these variations helps in selecting the right brush for the task or specifying the correct handle type for manufacturing.
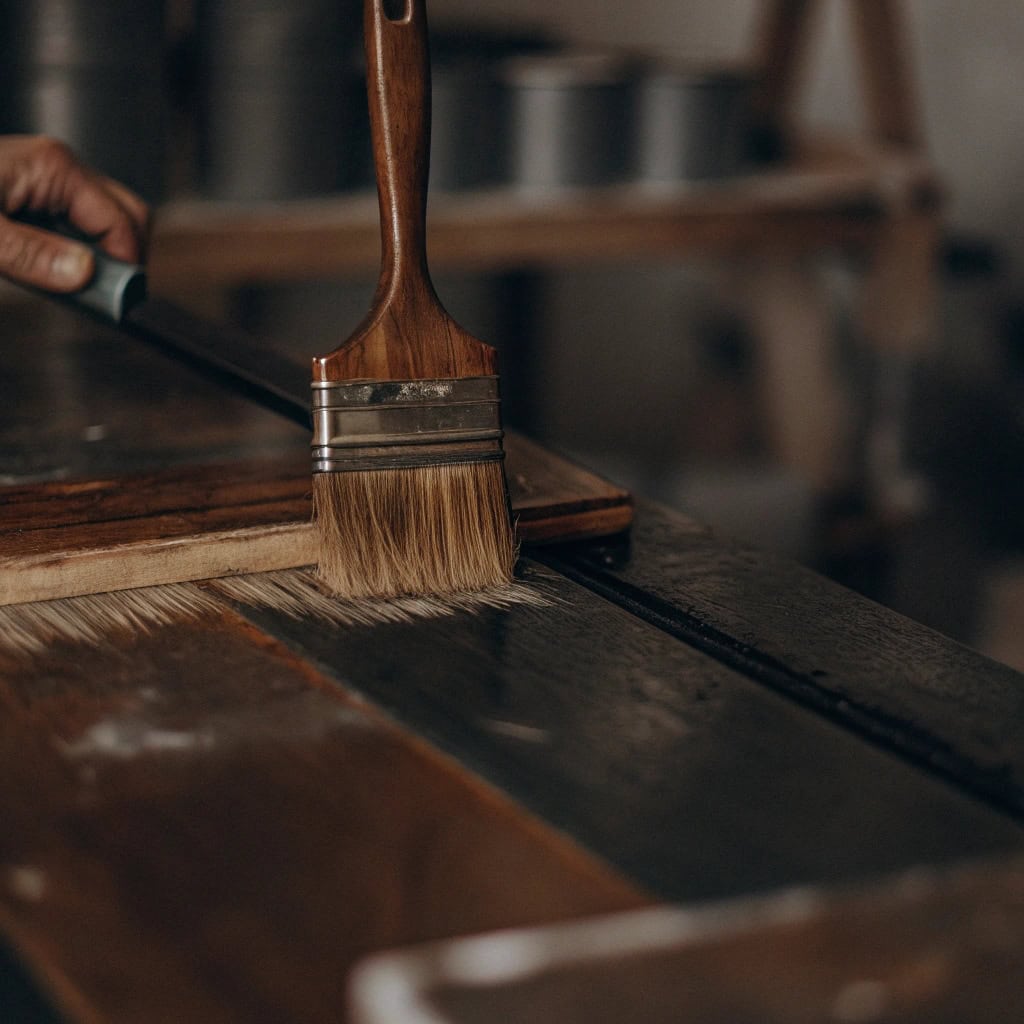
How Do You Prevent Brush Strokes on Wood?
Getting frustrated by visible brush strokes ruining your smooth painted finish on wood? This common painting problem detracts from a professional look and is often avoidable with the right technique and materials.
Prevent brush strokes by using a high-quality brush (appropriate bristles), thinning paint slightly if needed, applying thin coats, using proper technique (long, even strokes, "tipping off"), and avoiding over-brushing.
Diving Deeper into Achieving a Smooth Finish
Disclaimer: This section focuses on painting technique to avoid brush strokes on a wooden surface, rather than issues with the brush handle itself. However, a good quality brush, including its handle for control, contributes to achieving a good finish.
Visible brush strokes are often caused by paint being applied too thickly, drying too quickly, or being overworked. Here’s how to minimize them for a smooth, professional look on wood:
1. Surface Preparation
- Smooth Base: Start with a well-sanded, smooth, clean wooden surface. Imperfections in the wood will show through the paint. Use appropriate primer (especially on bare wood) and sand lightly between coats (primer and paint) with fine-grit sandpaper (e.g., 220 grit), removing dust thoroughly.
2. Choose the Right Brush and Paint
- Quality Brush: Use a high-quality brush with densely packed, finely tipped bristles appropriate for your paint type (synthetics for water-based, natural for oil-based). Cheap brushes with coarse or sparse bristles are much more likely to leave marks. The handle should feel comfortable and balanced for good control.
- Paint Quality & Consistency: Higher quality paints generally level out better (reducing brush marks) than cheaper ones. If the paint seems too thick and isn't flowing well, you can thin it slightly according to the manufacturer's instructions (e.g., with water for latex, or appropriate thinners like Floetrol for latex or Penetrol for oils). Don't over-thin.
3. Proper Paint Loading
- Dip Correctly: Dip only about one-third to one-half of the bristle length into the paint. Tap the brush gently against the inside of the can; don't wipe it heavily on the rim, as this removes too much paint.
- Avoid Overloading/Underloading: Too much paint leads to drips and thick marks; too little causes dragging and streaks.
4. Application Technique
- Apply Evenly: Apply paint in smooth, even strokes, working in manageable sections. Apply enough paint to cover but avoid excessive buildup.
- Maintain a Wet Edge: Work from unpainted areas into the wet edge of the previously painted section to ensure smooth blending and avoid lap marks.
- "Tipping Off" (The Key Step): After applying paint to a section, lightly sweep the tip of the brush (holding it almost perpendicular to the surface) in long, straight, parallel strokes across the entire section, going with the wood grain. Use very light pressure. This smooths out any initial brush marks and creates a uniform surface. Do this immediately while the paint is still very wet.
- Don't Over-Brush: Once you've applied and tipped off a section, leave it alone! Continuously brushing back and forth over paint as it starts to dry is a primary cause of visible brush strokes. Let the paint level itself.
5. Thin Coats
- It's almost always better to apply two or three thin coats rather than one thick coat. Thin coats dry more evenly and level out better, minimizing brush marks. Allow proper drying time between coats as recommended by the paint manufacturer.
Brush Stroke Prevention Summary
| Technique/Factor | Action | Why it Helps Prevent Strokes |
|---|---|---|
| Prep | Sand smooth, prime, sand between coats | Removes surface imperfections |
| Brush Choice | High quality, correct bristle type, clean | Better paint flow, less dragging/shedding |
| Paint Choice | Quality paint, appropriate thinner (if needed) | Better leveling properties |
| Loading | Dip 1/3-1/2, tap gently | Consistent paint amount on brush |
| Application | Even strokes, maintain wet edge | Smooth initial layer |
| Tipping Off | Light, long strokes with brush tip | Levels out initial marks for smooth finish |
| Avoid Over-Brush | Leave tipped-off section alone | Allows paint to level naturally as it dries |
| Thin Coats | Apply multiple thin layers | Better leveling, less buildup |
Achieving a stroke-free finish requires patience and attention to these details, combining good materials with proper technique. A comfortable, well-balanced handle aids the process.
Conclusion
Wooden brush handles crack/warp due to moisture changes or poor wood quality. Choose handles based on brush type (shape, length, connection). Maintain handles by cleaning gently and conditioning appropriately.
About Me (Darin Zhang)
I'm Darin Zhang, founder of JDW. With over 10 years in wood product manufacturing, I started on the factory floor and eventually built my own company. My brand's slogan is "Professional Wooden Product Manufacturer For Your Custom Wooden Product," and you can find us at https://woodenbrushhandle.com/. We understand how wood behaves and how to manufacture handles that last.
My journey in this industry brought me financial independence and allowed me to help many clients grow their businesses. Now, through JDW, I aim to share knowledge about wood products and manufacturing. Our mission is to make this expertise accessible to everyone, from beginners to professionals. I'm grateful for what the industry has given me, and I want to give back by helping others succeed in the field.
Understanding the Designer's Perspective (Jacky)
To better understand the challenges faced by those specifying and buying handles, let's consider someone like Jacky.
Jacky is a 35-year-old Wood Product Designer in Canada with a decade of experience. Working for a mid-sized furniture manufacturer, he focuses on high-quality furniture and custom wood components. His role involves ensuring that designs meet both aesthetic and functional requirements while being optimized for efficient production and craftsmanship.
For Jacky, understanding the causes of wood failure like cracking or warping (moisture, stability) is critical when designing furniture, especially pieces for kitchens or bathrooms. He needs to select stable wood species (like Beech), specify proper drying, and design joinery that accommodates wood movement. Knowing about different handle types and finishing requirements informs his design of functional hardware and components. Even understanding painting techniques helps him specify appropriate wood surfaces (like Poplar or Maple) for painted furniture pieces produced with components from manufacturers like JDW.