How Do You Make High-Quality Wooden Cabinet Handles in 8 Steps?
Want to understand how wooden handles are made, but find the process complex? Knowing the steps helps you evaluate suppliers and ensure quality for your own products.
Making wooden cabinet handles involves key stages: designing, selecting quality wood, precise cutting and shaping, meticulous drilling and sanding, applying a durable finish, and final quality control. Mastering these steps ensures a high-quality outcome.
Understanding the manufacturing process, from raw lumber to finished product, gives you valuable insight whether you're manufacturing yourself or sourcing from suppliers like my company, JDW. It helps you appreciate the details that contribute to quality. Let's walk through the essential steps involved.
Is Careful Wood Selection the First Step in Making Wooden Cabinet Handles?
Starting with subpar wood for your handles? This leads to defects, poor durability, and an inferior final product, ultimately disappointing customers and hurting your brand's image.
Yes, absolutely. Selecting the right wood species and grade, ensuring it's properly dried and free from major defects, is the critical foundation for making any high-quality wooden handle.
Diving Deeper into Wood Selection (Step 1 & 2: Design/Planning & Selection)
Before even touching the wood, there's usually a design and planning phase (Step 1). This involves creating drawings or CAD models specifying the handle's dimensions, shape, wood type, finish, and hardware requirements. This plan guides the entire process.
Once the design is set, the physical process begins with wood selection (Step 2). This is arguably one of the most crucial stages, as the final quality is highly dependent on the raw material. At JDW, we place immense emphasis on this initial step.
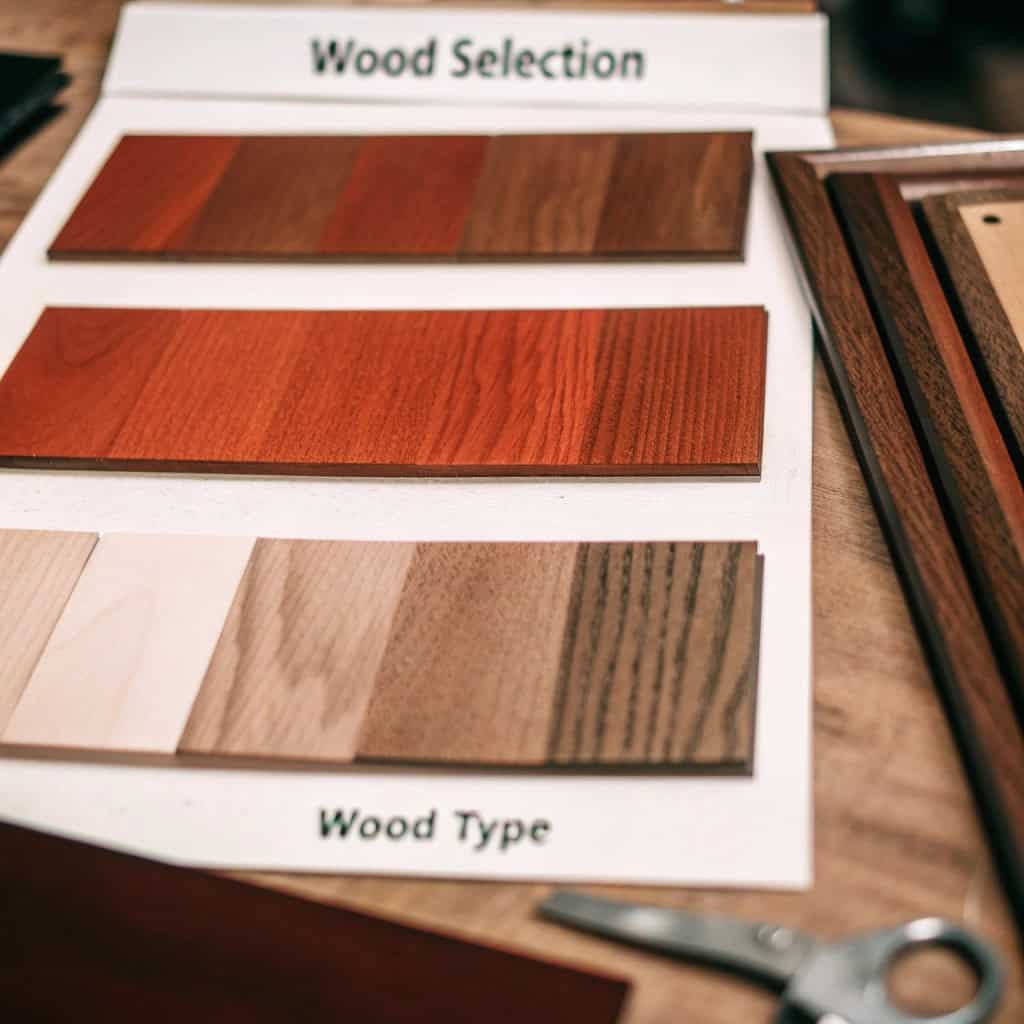
Choosing the Right Species
Different woods offer different looks, durability, and workability.
- Hardwoods (Oak, Maple, Beech, Ash): Generally preferred for handles due to their strength, density, and wear resistance. Oak has a prominent grain, Maple is smooth and hard, Beech is stable and cost-effective.
- Softwoods (Pine, Fir): Less common for quality handles as they dent and scratch easily, though sometimes used for rustic styles or specific budget constraints.
The choice depends on the desired aesthetic, the expected wear and tear, and the budget.
Assessing Wood Grade and Defects
Lumber is graded based on the presence of defects. For handles, especially those with a clear or natural finish, using higher-grade wood (with fewer defects) is important. We inspect incoming lumber for:
- Knots: Large, loose, or cracked knots are rejected as they weaken the wood and look bad. Small, tight knots might be acceptable depending on the style.
- Cracks/Splits: These compromise integrity and are unacceptable.
- Warping/Twisting: Indicates instability, often from improper drying. Rejected.
- Discoloration/Stains: Unwanted unless part of a specific aesthetic.
- Insect Damage: Unacceptable.
Ensuring Proper Moisture Content (MC)
Wood must be dried to the appropriate MC (usually 6-10% for interior use) to prevent shrinking, swelling, warping, or cracking after the handle is made. We use moisture meters to verify the MC of incoming lumber. I learned early in my career that skipping this check is asking for trouble; improperly dried wood caused significant issues in finished products for a former employer.
Wood Selection Criteria Summary
| Criteria | Importance | JDW Approach | Why It Matters |
|---|---|---|---|
| Species | High | Select based on design, durability, budget | Aesthetics, strength, cost |
| Grade/Defects | High | Strict visual inspection, reject unacceptable flaws | Appearance, structural integrity |
| Moisture | Critical | Meter checks, ensure 6-10% MC range | Stability, prevents warping/cracking |
| Grain | Medium | Consider for strength (esp. pulls) & appearance | Strength (along grain), visual consistency |
Starting with carefully selected, properly dried, and appropriately graded wood sets the stage for a successful manufacturing process and a high-quality final handle.
How Crucial is Precise Cutting and Forming for Shaping Wooden Cabinet Handles?
Getting handles with inconsistent shapes or rough cuts? Imprecise manufacturing leads to poor fit, an unprofessional appearance, and difficulties in subsequent finishing steps.
Extremely crucial. Precise cutting ensures blanks are the right size, while accurate forming (using routers, shapers, or CNC) creates the final consistent shape specified in the design.
Diving Deeper into Cutting and Shaping (Step 3 & 4)
Once suitable wood is selected, the next steps involve transforming the raw lumber into the basic shape of the handle. This typically involves rough cutting followed by precise shaping.
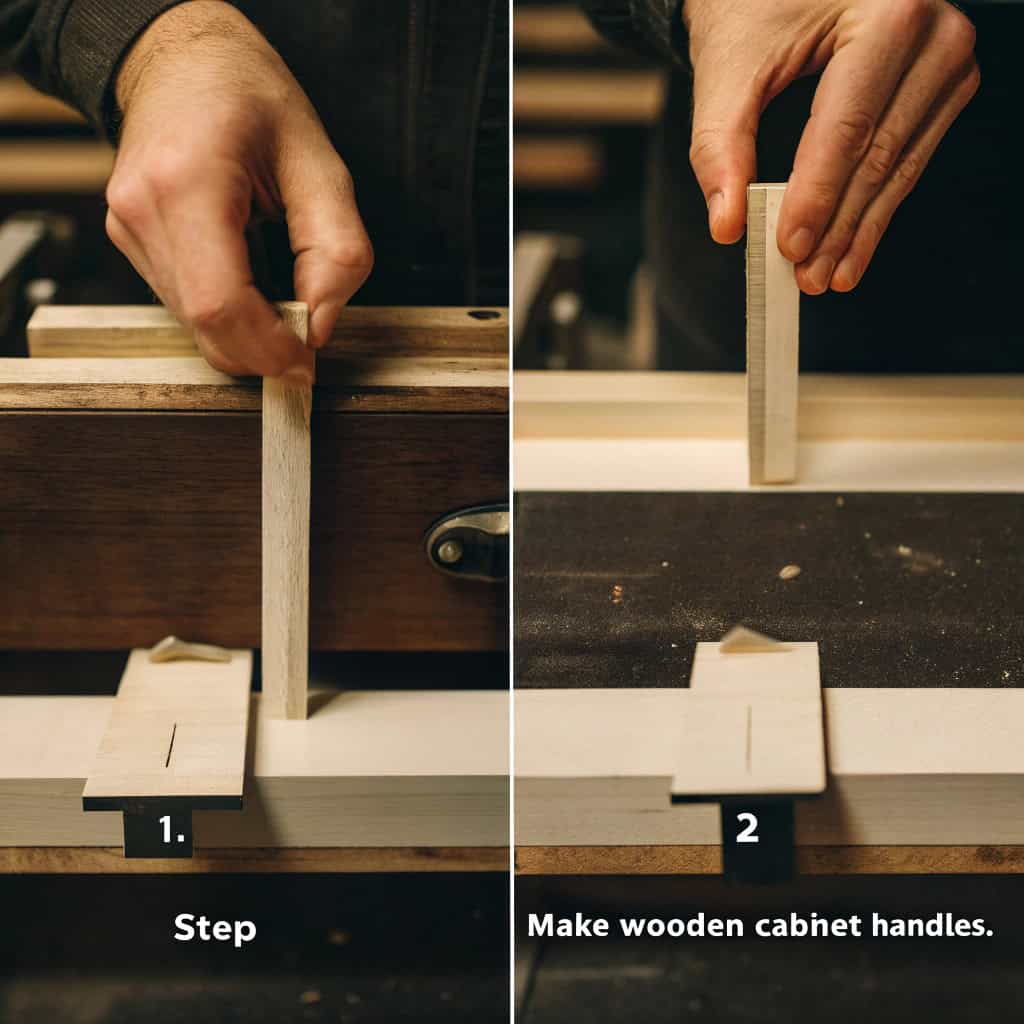
Rough Cutting (Step 3)
The goal here is to break down the larger lumber planks into smaller, manageable blanks that are slightly oversized compared to the final handle dimensions.
- Process: This usually involves using saws (like cross-cut saws and rip saws) to cut the lumber to the approximate length and width needed for each handle. Planning the cuts carefully helps maximize yield and minimize waste.
- Importance: While seemingly basic, accurate rough cutting ensures that the subsequent shaping process has enough material to work with and that grain direction is maintained correctly (especially important for pull handles, which should ideally have the grain running along their length for maximum strength).
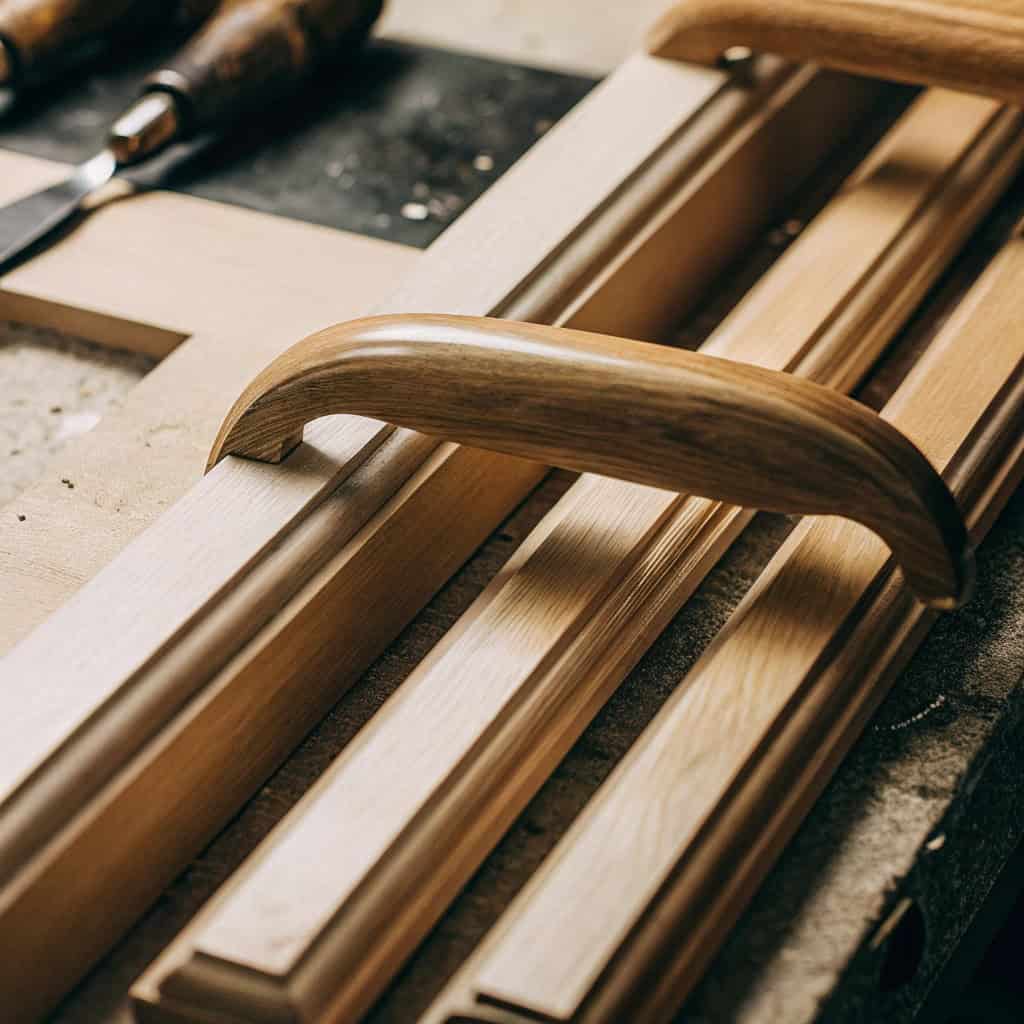
Shaping/Forming (Step 4)
This is where the handle takes its final profile. The method depends on the handle's complexity, the required volume, and the available equipment.
- Methods:
- Routers/Shapers: For simpler profiles or smaller batches, handheld routers or table shapers with specific cutter bits can be used, often guided by templates or jigs for consistency.
- Lathes: Used for creating round knobs or handles with turned profiles.
- CNC (Computer Numerical Control) Machining: Ideal for complex shapes, high precision, and large production volumes. A computer program guides the cutting tools (router bits, drills) to shape the handle exactly according to the digital design (CAD file). This offers excellent repeatability. At JDW, we utilize CNC technology extensively for consistent results on custom orders.
- Key Factors for Quality:
- Machine Accuracy/Calibration: Ensuring machines are precise.
- Tool Sharpness: Using sharp cutting tools is vital to prevent burning, tear-out (chipping), and rough surfaces.
- Jigs/Fixtures: Securely holding the wood blank during shaping prevents movement and ensures accuracy.
- Operator Skill/Programming: Correct machine setup, feed rates, and programming are essential.
Precision at this stage is critical because errors are difficult and costly to correct later.
Cutting & Shaping Considerations
| Aspect | Key Goal | Common Challenges | JDW Approach |
|---|---|---|---|
| Rough Cutting | Accurate blanks, good yield, grain align | Waste, inaccurate size, wrong grain | Careful planning, sharp saws |
| Shaping Accuracy | Consistent profile, matches design | Inconsistent shapes, poor tolerances | CNC machining, calibrated equipment, jigs |
| Surface Quality | Smooth cut, no tear-out/burns | Roughness, tear-out, burn marks | Sharp tooling, optimized speeds/feeds |
| Efficiency | Minimize time and waste | Slow process, high material waste | Process optimization, nesting (CNC) |
Precise cutting and shaping transform a simple wood blank into the recognizable form of the handle, laying the groundwork for the finishing steps.
How Do Meticulous Drilling and Sanding Ensure Wooden Cabinet Handle Quality?
Finding handles with off-center screw holes or a rough feel? Sloppy drilling makes installation difficult, while poor sanding results in an unpleasant touch and flawed finish appearance.
Meticulous drilling ensures accurate hole placement for easy mounting. Thorough sanding creates a perfectly smooth surface, essential for both a comfortable feel and proper adhesion of the final finish.

Diving Deeper into Drilling and Sanding (Step 5 & 6)
After the handle has its basic shape, two crucial refinement steps follow: drilling the mounting holes and sanding the surfaces smooth. Both require precision and care.
Drilling Mounting Holes (Step 5)
Most cabinet handles need holes for screws to attach them to doors or drawers.
- Accuracy is Key: The holes must be:
- Positioned Correctly: The center-to-center distance between holes (for pulls) must be exact to match standard cabinet drilling or pre-drilled holes. Off-center holes on knobs look wrong.
- Drilled Straight: Holes must be perpendicular to the mounting surface so the handle sits flush.
- Correct Diameter & Depth: Holes need to be the right size for the specified screws, and drilled to the correct depth (often counterbored on the back).
- Methods: This can be done using drill presses with jigs for accuracy, or integrated into the CNC machining program for maximum precision and repeatability.
- Potential Issues: Dull drill bits can cause tear-out around the hole entrance or exit. Incorrect jig setup leads to misplaced holes.
Sanding (Step 6)
Sanding removes any minor imperfections left from shaping and creates the final smooth surface. This is often a multi-stage process.
- Purpose:
- Smoothness: To create a surface that feels pleasant to touch.
- Remove Defects: To eliminate machine marks, minor scratches, or raised grain.
- Prepare for Finishing: A properly sanded surface allows the finish (paint, lacquer, oil) to adhere correctly and look uniform.
- Process:
- Grit Progression: Typically starts with a medium grit sandpaper (e.g., 120 or 150 grit) to remove shaping marks, followed by progressively finer grits (e.g., 180, 220 grit or higher) to achieve final smoothness. Skipping grits results in visible scratches.
- Methods: Can involve belt sanders, spindle sanders, random orbit sanders, or hand sanding, especially for complex shapes or final touches. At JDW, we often use a combination depending on the handle design.
- Edge Easing: Gently sanding sharp edges makes the handle more comfortable to hold and less prone to chipping, unless a sharp edge is part of the design.
- End Grain Attention: End grain absorbs finish differently and often requires finer sanding to prevent roughness.
- Quality Check: The surface should feel perfectly smooth when touched, with no visible scratches or roughness, especially when viewed under good lighting.
Drilling & Sanding Importance
| Step | Key Objective(s) | Common Defects if Done Poorly | Impact on Final Product |
|---|---|---|---|
| Drilling | Accurate hole placement & size | Off-center, angled, wrong size holes | Difficult installation, poor fit/look |
| Sanding | Smooth surface, prepare for finish | Roughness, scratches, unevenness | Poor feel, flawed finish appearance |
Meticulous drilling and sanding are refinement steps that significantly impact both the functionality (installation) and the perceived quality (feel and finish appearance) of the handle.
How Does Surface Treatment Improve Durability and Aesthetics for Wooden Cabinet Handles?
Are your handles easily stained, scratched, or damaged by moisture? An inadequate or poorly applied finish fails to protect the wood and detracts from its natural beauty or intended color.
Surface treatment (finishing) seals and protects the wood from moisture, dirt, and wear, enhancing durability. It also provides the desired look, whether clear-coated, stained, or painted, boosting aesthetic appeal.
Diving Deeper into Surface Treatment (Step 7)
Applying a finish is typically the final manufacturing step before quality control and packing. It serves both protective and aesthetic functions and is critical to the handle's performance and appearance over time.
Purpose of Finishing
- Protection: Wood is porous and susceptible to:
- Moisture: Absorbing moisture can cause swelling, shrinking, or warping. Finishes seal the pores.
- Dirt and Oils: Finishes prevent dirt and oils from hands from penetrating the wood, making handles easier to clean.
- Wear and Tear: Provides a protective layer against minor scratches, scuffs, and abrasion.
- Aesthetics:
- Enhancing Natural Beauty: Clear finishes (lacquer, varnish, oil) bring out the natural color and grain of the wood.
- Adding Color: Stains alter the wood color while allowing grain to show. Paints provide an opaque color.
- Controlling Sheen: Finishes determine the final gloss level (matte, satin, semi-gloss, gloss).
Common Finishing Materials
- Lacquers (Nitrocellulose, Acrylic): Fast-drying, provide a hard, clear or colored film. Common for factory finishing. Acrylics are less prone to yellowing.
- Varnishes/Polyurethanes: Very durable, good resistance to abrasion and moisture. Available in oil-based (more durable, amber tint) and water-based (clearer, lower VOC) formulations.
- Paints: Provide an opaque color. Require good surface preparation (often priming) for adhesion and smoothness.
- Oils (Tung, Linseed, Mineral): Penetrate the wood, providing a natural look and feel. Offer less surface protection than film finishes but are easy to repair/reapply.
- Waxes: Often used over oil or as a standalone light finish. Provide a soft sheen and feel but minimal protection.
Application Methods and Quality
- Spraying: Most common for lacquers and paints in production settings. Provides an even, smooth coat when done correctly (HVLP guns are efficient). Requires a clean spray booth.
- Brushing: Can be used but requires skill to avoid brush marks.
- Wiping/Rubbing: Typical for oil and some stain applications.
- Dipping: Sometimes used for small items or initial sealing coats.
- Key Quality Factors: Thorough surface prep (clean, smooth wood), using quality materials, applying multiple thin coats (often with sanding between coats), allowing adequate drying/curing time, and maintaining a clean application environment are all crucial for a defect-free, durable finish. At JDW, our finishing department follows strict protocols to ensure consistent results.
Finishing Options Overview
| Finish Type | Protection Level | Look/Feel | Application | Key Benefit |
|---|---|---|---|---|
| Lacquer/Varnish | Good-Very Good | Clear/Colored Film | Spray/Brush | Durability, Clarity |
| Polyurethane | Very Good | Clear/Amber Film | Spray/Brush | High Durability |
| Paint | Good-Very Good | Opaque Color | Spray/Brush | Unlimited Colors |
| Penetrating Oil | Fair-Good | Natural Feel | Wipe/Rub | Enhances Grain |
The right surface treatment protects the handle and completes its look, turning a piece of shaped wood into a finished, functional product.
What Are the Key Steps to Master for Manufacturing Wooden Cabinet Handles?
Want a clear overview of the entire handle-making process? Understanding the complete workflow helps you manage production or evaluate suppliers more effectively from start to finish.
Mastering handle manufacturing involves eight key steps: Design/Planning, Wood Selection, Rough Cutting, Shaping/Forming, Drilling, Sanding, Finishing, and finally, Quality Control/Packing. Each step builds upon the last.

Diving Deeper into the 8 Key Steps (Summary & Step 8: QC/Packing)
We've explored the critical stages in detail. Let's summarize the typical 8-step workflow for manufacturing high-quality wooden cabinet handles, including the final crucial step.
The 8-Step Manufacturing Workflow
- Design and Planning: Defining the handle's specifications (shape, size, wood, finish, hardware) usually via drawings or CAD models. Planning production flow.
- Wood Selection: Choosing the appropriate wood species and grade, ensuring it's properly dried (correct MC) and free from unacceptable natural defects.
- Rough Cutting: Cutting raw lumber into oversized blanks suitable for the specific handle, optimizing for yield and grain direction.
- Shaping/Forming: Using machinery (CNC, routers, lathes, shapers) to accurately shape the blank into the final handle profile according to the design.
- Drilling: Precisely drilling mounting holes to the correct size, depth, and spacing.
- Sanding: Progressively sanding all surfaces to achieve required smoothness, remove machine marks, and prepare for finishing.
- Finishing (Surface Treatment): Applying the chosen finish (clear coat, stain, paint, oil) evenly and ensuring proper curing for protection and aesthetics.
- Quality Control (QC) and Packing: This final step is critical.
- Final Inspection: Trained QC staff inspect finished handles against the approved standard/sample. They check dimensions, shape, finish quality (no defects), structural integrity (no cracks), and overall appearance. Sampling plans (like AQL) may be used for large batches.
- Remediation: Identifying and addressing any defects found (e.g., sorting, reworking if possible, or rejecting).
- Packing: Carefully wrapping and packing handles to prevent damage during shipping and handling. Using appropriate packaging materials (boxes, dividers, wraps). Ensuring correct counts and labeling.
Workflow Summary Table
| Step # | Stage | Key Activity | Quality Focus |
|---|---|---|---|
| 1 | Design/Planning | Create specs & drawings | Clear requirements, manufacturability |
| 2 | Wood Selection | Inspect & choose lumber | Correct species/grade, MC, no major defects |
| 3 | Rough Cutting | Cut blanks from lumber | Size accuracy, yield, grain orientation |
| 4 | Shaping/Forming | Machine handle profile | Dimensional accuracy, shape consistency, smooth cut |
| 5 | Drilling | Create mounting holes | Positional accuracy, correct size/depth |
| 6 | Sanding | Smooth all surfaces | Smoothness, no scratches, prep for finish |
| 7 | Finishing | Apply protective/decorative coating | Evenness, adhesion, durability, no defects |
| 8 | QC & Packing | Inspect final product, pack securely | Conformance to spec, consistency, protection |
Mastering each of these eight steps, with robust quality checks integrated throughout, is how manufacturers like JDW ensure the consistent production of high-quality wooden cabinet handles that meet client expectations.
Conclusion
Making quality wooden handles involves 8 key steps: design, wood selection, cutting, shaping, drilling, sanding, finishing, and QC/packing. Understanding this process helps ensure excellent results for your products.
About Me (Darin Zhang)
I'm Darin Zhang, founder of JDW. With over 10 years in wood product manufacturing, I started on the factory floor and eventually built my own company. My brand's slogan is "Professional Wooden Product Manufacturer For Your Custom Wooden Product," and you can find us at https://woodenbrushhandle.com/. We specialize in executing these manufacturing steps precisely for custom orders.
My journey in this industry brought me financial independence and allowed me to help many clients grow their businesses. Now, through JDW, I aim to share knowledge about wood products and manufacturing. Our mission is to make this expertise accessible to everyone, from beginners to professionals. I'm grateful for what the industry has given me, and I want to give back by helping others succeed in the field.
Understanding the Designer's Perspective (Jacky)
Jacky is a 35-year-old Wood Product Designer in Canada with a decade of experience. Working for a mid-sized furniture manufacturer, he focuses on high-quality, custom components. His job involves balancing aesthetics, function, and production efficiency. He's skilled in CAD, understands woodworking deeply, and collaborates closely with production teams.
For Jacky, understanding the 8 steps of handle manufacturing is crucial. It allows him to design handles that are not only beautiful but also manufacturable efficiently and to a high quality standard. Knowing the process helps him communicate effectively with suppliers like JDW, specify materials and finishes appropriately, and anticipate potential challenges related to wood selection, machining complexity, or finishing requirements. This knowledge bridges the gap between design intent and production reality.